Friday, September 7, 2012

How To Make A Pottery Barn Skeleton Vase


I know it has been a while, a very, very long while but for those that may not know I am in the middle of rebuilding my life. On January 31st, shortly after my last post here a fire consumed my home and everything with it including my beloved pets. Only Samhain and I remain along with my turtle Fred. While I am not able to create on the scale I was for a while I can show you some things I am doing to pass the time while I rebuild my home.

Pottery Barn Skull Vase Tutorial


I LOVE these vases but at $150.00 each and the fact that enough people bought them for them to sell out had me thinking of a way to recreate them for myself.

Supplies

You Will Need:

• A package of Sculpey, Fimo or Premo Polymer Clay - Transparent is best
• Sculpey tools or make-shift ones found around the home
• Glue (depending on the type of vase you use) I used Elmers China and Glass Cement
• Aluminum Foil
• Heavy Duty Elastic Band
• Toaster oven or regular oven
• Spray Paint Satin Finish in Ivory
• Van Dyke Brown Acrylic Paint
• Paper Towels
• Vase of your choice
• Plastic to protect while painting

First Step:

Thick sturdy foil draped over the top of the vase for clay support

Lay the vase down on it's side and wrap a thick layer of foil over it but not around it as you will have to remove this later. The thick layer is meant to hold it's shape when you remove the foil for baking.

Condition your clay by kneading it until it is soft. I used a half a package for my skull. If you would like to have a skull closer to that of Pottery Barn then you can use less.

Roll the clay in between your palms loosely so it forms a sort of UFO shape.

Place the ball on your vase and begin to push down to flatten the edges while pinching the bottom to make the jawline.

Use your finger to smooth the surface.

Rock the ball of clay into a UFO shape

Flatten the ends of the skull while shaping the jawline


Now take your tools and begin to shape the face as so:

Use a rounded end to make the eyes

Rock the tool back and forth facing away from the nose to create a more almond shape for the eye sockets.

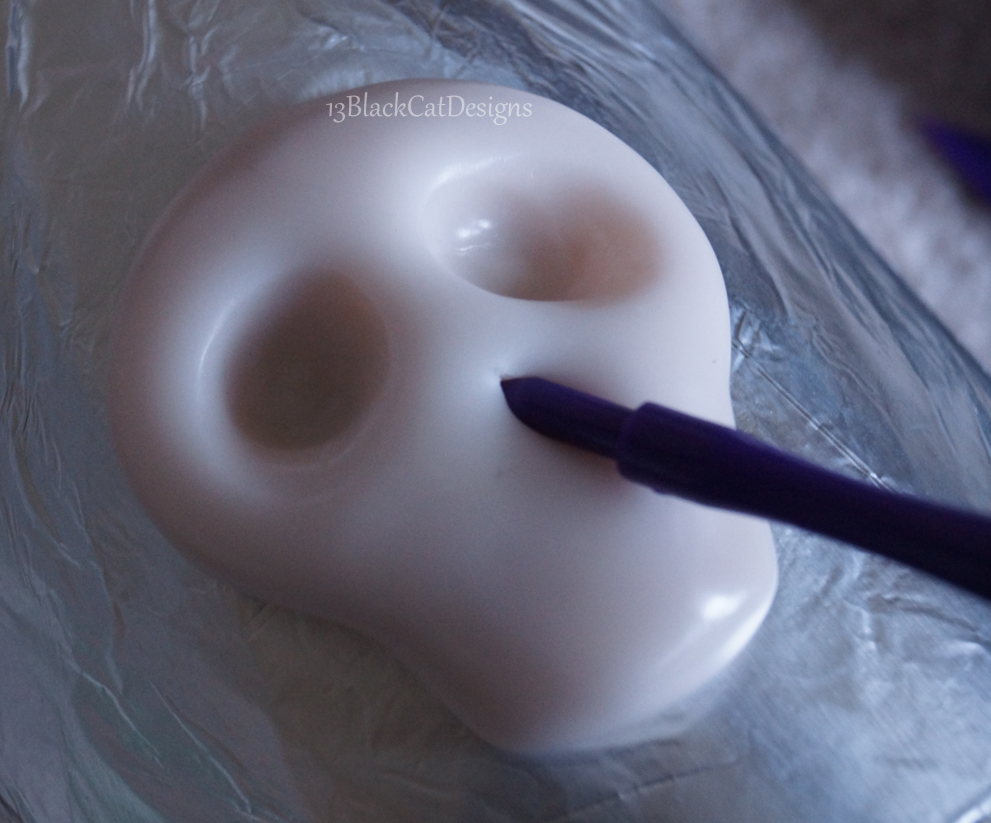
Use a pointed tool to make the nose

Do the same for the nose

Cut in teeth

"Cut" Three lines for the teeth making sure the top teeth are a bit bigger than the bottom like so:

Lines for teeth, make tops bigger than the bottoms

Then cut the teeth vertically also making sure the top are larger than the bottomCarefully remove the aluminum foil and place on a baking sheet with some balled or rolled up foil underneath to support your skull.

Ball up the foil underneath for support

Bake according to the directions on the package. Usually 30 minutes for each 1/4 of an inch at 275 degrees F. Mine baked for over an hour.

Secure with a rubber band

After your skull has baked and thoroughly cooled adhere it to your vase. Hold firmly for a minute and use a strong rubber band to keep it in place as the glue dries.

Once the glue dries take your vase outside and give it a few coats of spray paint. (Just make sure it is not too windy or buggy. I had to do some sanding and fixing of little buggy corpses)

REMINDER: Several thinner, even coats from further away are best when spray painting. Too close or too thick a coat will cause drips.

Needs a few more coats

A Happy Accident!
It seems that it was a bit too moist out to really spray paint but it turned out ok in the end. If you would like to get a bit of a crackle effect try dabbing a VERY thin layer of water in little spots (I would suggest using a scrap piece of something handy to practice and make sure that is the effect you are going for) Very little moisture will work so don't go crazy.

Get Gloppy With It

Now here comes the fun messy part. To antique your vase add a fair amount of water to your acrylic paint. It should be soupy but not too thick. Take a paper towel and drench it in the mixture then daub it on the vase working in small sections. Take a second paper towel and using a combination of pats and wipes begin to remove the paint. Do not remove all of it and try to keep the aging effect inconsistent. Take your time but know if you mess up (Are there really any mess ups?) You can wait for it to thoroughly dry and re-spray paint the vase to start over.

I prefer the matte look however you may spray your piece with a clear gloss
It is your vase, Have fun with it!

Well, there you have it, I hope you enjoyed my first tutorial of this caliber!

My vase ended up costing a little less than $30 but that is because I had to buy a vase and supplies as opposed to using ones I had. I did use a 40% coupon for Michaels (or ACMoore, I forget which I was in at the time) to lessen the cost of the vase.

Please feel free to share this tutorial but make sure you give credit (It is just the polite thing to do) If you make a vase please also share what you have done. I am considering making a few tutorials as a way to pass the time and I would love to see what all of you have done too!


Thank you Knock Off Decor for featuring this tutorial on your site!


.

Tuesday, January 24, 2012

2012 GBK Golden Globes Gifting Suite Part Three

Stories From Both Days

The Artisan Group's Table Display
Normally I write about each day at the lounges but some unforseen "distractions" has muddled my memory as to when people came around so I am going to pick a few photos and tell a bit of a story about them. If you would like to see all the photos of the Gift Lounge visit The Artisan Group's Facebook Page and don't forget to like them while you are there!

Jeremy Irons with SariBlue
I was pretty excited to meet Jeremy because he was in one of my all time favorite movies. When he came over to our table I introduced myself and said "I know you have been in a ton of movies and have done a lot of amazing work both in film and out but I must tell you that you were in my all time favorite movie" To which he replied "Really? Which?" and I said "The Lion King" which was greeted with a confused smirk, chuckle and a bit of shock. I really do not think he was expecting that but it is the truth.

Bailee Madison with The Write Stuff
What a sweet little girl! The last time I saw Bailee she was practically half the size she is now. While she flitted around the table like a hummingbird on a sugar high, delighting in everything we had, Valerie and I chatted with her mother. Through the conversation I found out a little something about Bailee, something she likes more than anything and it just so happens that I can make what she loves. I have made arrangements to get this item to her and as soon as I know she has it I will post a little story about it. I don't want to ruin any surprises after all.

Janina Gavankar admiring JuditB Jewelry
Once Janina came to the table it took her a split second to remember us and she gave Valerie a big hug. Last time she visited us was at the Emmy Gift Lounge and she chose Gary Hirsch's Bots as her favorite thing in the whole lounge! This time she picked a most beautiful bracelet by Lapis Beach and featured it on her website.

Janina wasn't the only one...

Raphael Sbarge, Valerie and Me (and darn-it I am actually wearing heels)
Raphael was one of the nicest celebrities (actually the ones that stopped by our table were all very nice) He was genuinely interested in everything on the table asked questions and told us he had a surprise for us. We had to wait a little while but when the surprise came it was a big one! There will be 8 pages total and four have already been posted. We can't thank them enough for the feature!

Another great surprise came when Actress Tess Hunt and Glee Actor Josh Sussman made this as a thank you to our group:


This has to be one of the coolest things and it is so great being able to see a true reaction to your gift as it is opened. (My gift is opened just after the 7:00 mark) Oh and Tess, we certainly don't mind the video being long..

Well, that is it for today, there will be a few more stories soon so while you are waiting hop on to Twitter tonight at 8pm EST and join in The Artisan Group's Twitter Party. You can win fabulous hand-made items like the celebs got and it is a ton of fun. Just follow @TheArtisanGroup and @BlackCatDesign and brush up on your trivia! See you there!


.

Saturday, January 21, 2012

2012 GBK Golden Globes Gifting Suite Part Two


It is setup day!


We are lucky to have two members that happen to live in the L.A. area and we were grateful for the help. Both Rachel Leathers and Jean Roth came to the hotel to help unpack, put the risers and backdrop together and unwrap all the displays. There was a lot to do and they both made it smooth. Setup didn't take long and cleanup wasn't bad which left us plenty of time to make sure everything was perfect.


After bidding goodbye to Jean and Rachel, Valerie and I headed back to the room to get ready for the industry mixer. This is where agents, publicists, PR people and the like head in and look around at the vendors. It is also a chance to meet the other vendors.

When we came back to the roof where the event was to happen, we were once again blown away by how lovely the venue looked.

Looking from our table to the entrance
Photo wall for when the celebrities arrive
How gorgeous is this?

Yup, that is cake! Well, sort of, the outside was but the inside was not. It did have to be there for three days afterall.

The rest of the night was mingling, seeing the now familiar faces of the talent agents and hors d'oeuvres.

Stay tuned for Part Three!


.


Thursday, January 19, 2012

2012 GBK Golden Globes Gifting Suite Part One

Yup, it is that time again, awards time and once again I flew out to California to represent the fabulous artists of The Artisan Group as well as myself.

The next few days will be behind the scenes, great photos and a few fun stories about my time there. So let us see, where to start? I guess the flight out would be a nice start. Last year at this time (if you happen read my blog at all) I was stuck for 10 hours in an airport because of a crazy snowstorm, not fun at all. This time the flight was smooth and I got to L.A. a day before set-up.


The beautiful L'Ermitage Hotel in Beverly Hills was to be the backdrop for the event and I must say, it was beautiful and I enjoyed my time looking around and having a hot apple cider with cookies while I waited for Valerie to arrive.

How beautiful is this room?

I didn't have to wait very long before Valerie pulled up, I saw her this time because the balcony overlooked the street.

Hi Val!

View of L.A. from the balcony

After we got settled we decided to take a walk up to the roof and see the pool and where the event was to take place. If you squint really hard you can see the Hollywood Sign up in the hills (I will save the pool picture for later)


Since we were all settled in we decided to have one nice dinner because the rest of the time would be hectic working (but a ton of fun too!)

Val saw Phyllis Diller, I saw the back of her head
Settled and full from a delicious dinner and excited for tomorrow we headed to bed.

Stay tuned for part two!

.


____________________________________________________________
meow ^..^ meow ^..^ meow ^..^ meow ^..^ meow ^..^ meow ^..^ meow ^..^ meow
____________________________________________________________
Respect Copyrights.
No printing, lifting images or downloading without explicit permission from the author of this blog, Nikki Cutro.
©Nikki Cutro and 13 Black Cats Designs. All rights are reserved.