
 | I thought it might be nice to show you one of my paintings from the ground up. I have been meaning to do this for a while but this time I actually had my camera and remembered to stop and take some photos. The photo on the left is the first stage of a sunflower. My neighbor has them growing down the sides of her driveway and I thought I would share them with all of you. After lightly sketching the flower in pencil I taped off the sides to get a nice clean edge for the finished painting.I began laying down the first color of Lemon Yellow |
I picked up some Cadmium Yellow, Cadmium Yellow Medium and Yellow Ochre respectively and began sketching in the veins and defining the individual petals. The sun was behind the real sunflower and this gave a stained glass effect where one petal would shine through another. I tried to capture that by adding in shadows with the Cadmium Yellow Medium Paint When I was finished I took some Sap Green and Naples Yellow to add some interest and break up the yellows. Since this was a fairly young flower it still had shades of green in it. | 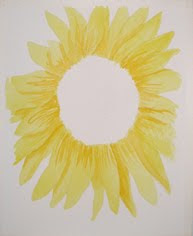 |
 | After all of the deatils were layed in I used a wash of clear water to blend the harsh lines and to soften the colors a bit. When I was happy with it so far I took light wash of Lemon Yellow and applied it to all of the petals. I did this twice to even out the tones. |
Originally I was going to paint the center a greenish yellow as it was in real life but decided that the dark brown would compliment the background I had in mind. Using a mixture of Antique Olive and Antique Elm and Sap Green I began to lightly splotch (really I don't think there is a word for it) in random bits of color in the background. I repeated this several times building up the layers until they were dark enough to make the yellow petals pop. |  |
 | With Vandyke Brown And Raw Sienna , I took a liner brush and began making small circles in a sprial motif until I finished the whole insides. I applied a wash of clear water again to smooth out my harsh lines. I added shading underneath and in the center using Sepia. and smoothed it out again with clear water. I am pretty happy with the way it came out. I find if I stare at it too much I overwork it and I did not want to do this here so I put the brush down. |


.
No comments:
Post a Comment